Cleaning Used Acrylic Painting Water
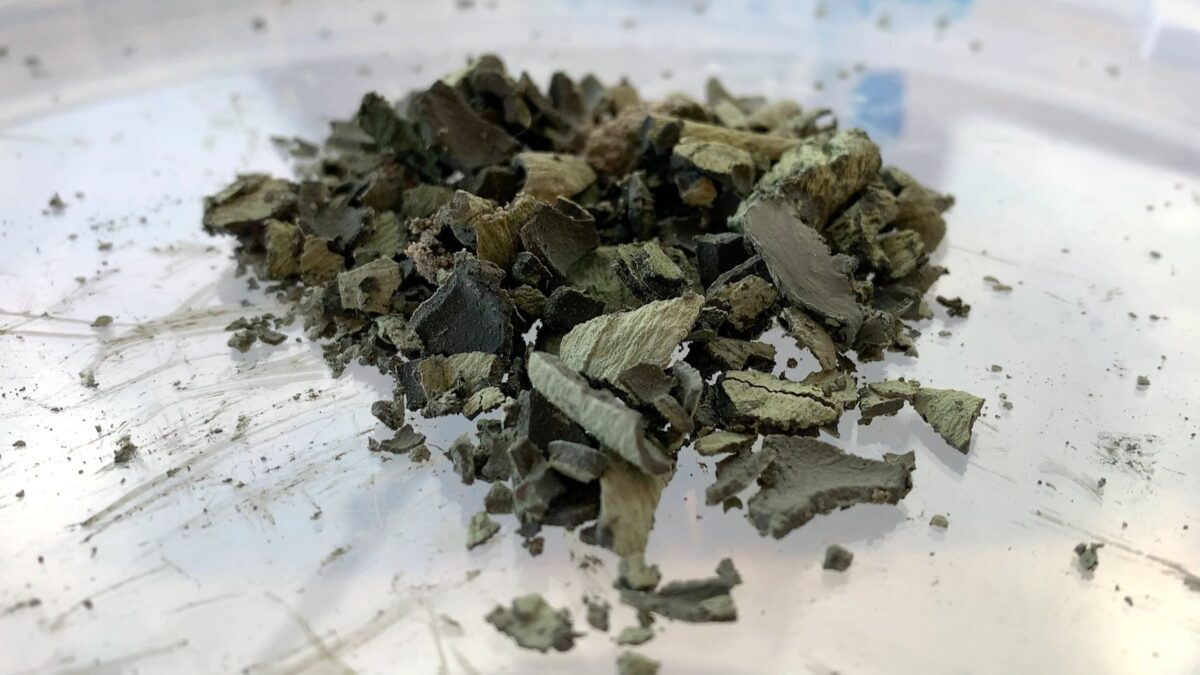
Cleaning used acrylic painting water is not something I had to think about much while I was predominantly using watercolour. I’ve used acrylics and oils over the years from time to time, but only to satisfy my ‘how does this work’ curiosity. That meant the volume of use was small and infrequent. But, doing Lewis Noble’s workshop, I found myself using acrylics intensively for a week. By the end of the week, I had a 5 litre bucket full of sludgy green water and the knowledge that if I poured it down the drain I would be polluting the water system. The image above this post is the paint solid extracted from 5 litres of water!
What to do with all this sludgy painting water?
I decided that if I was going to continue to use acrylics, I would need to find a solution to cleaning used painting water. Not only that, but I needed to do this with, as far as possible, using what I already had. If we look at the problem from the start, keeping the water clean for longer is a good starting point. Rather than using paper, I use some old sheets which can be reused for a long time. Once they can’t be used any longer, they can be turned into the covers for sketchbooks.
The first thing I tried was filtering the water through a coffee filter – the water was still opaque and sludgy, and very quickly, the coffee filter had clogged up so the process slowed to an unworkable pace. Two coffee filters or a coffee filter with a blue paper inner layer didn’t make much of a difference so it seemed clear that I needed to do something else.
Then, could get the water to evaporate, leaving the sludge behind in the bottom of the bucket? I found four buckets and split the water equally to get the maximum surface area. Sadly, northern hemisphere temperatures in spring are just not high enough to evaporate the water fast enough. I put them in the garden in the sunshine, but progress was just too slow. Warmer weather could make a difference, or pouring the water into a gravel bed. However, I would rather find a solution that requires less permanent space to be allocated, and that has reliable results.
My preferred option for cleaning used acrylic painting water
Finally, I decided to use a version of the method used by Golden. My husband has experience in pharmaceutical manufacturing so we read the process and did some research on what we would need and how we could do it. The principle is simple. This is just a matter of making the solid particles in the water stick together so they can be taken out of the suspension more easily. I had to convert the quantities for a UK context.
The two chemicals involved in this process are commonly used in the garden. Contrary to the concerns expressed on social media, this means they are safe to use with reasonable precautions as you would in the garden, and they are readily available. (Just don’t ingest them and pay attention to any manufacturer’s warnings on the product labels):
- Aluminium Sulphate is commonly referred to as Alum and is used to lower the pH of the soil for acid-loving plants.
- Garden Lime is used as a soil conditioner. It adds calcium and magnesium to the soil and counters acidity.
The effect of using these two substances in the right quantities is that the clear water that is disposed of will be pH neutral.
Step by step process for cleaning used acrylic painting water:
- Collect the water into a 5 litre bucket
- Dissolve 15g of Alum in a small container with some of the water. It may not go into a perfect solution but you can get it evenly distributed.
- Pour this mixture into the sludgy water and mix well with a stick.
- Sprinkle 15g Lime into the water and mix.
- Within a few minutes, you should start seeing distinct particles appearing in the water and then settling towards the bottom of the bucket. Once the top layer of the water becomes clearer, measure the pH with a pH meter or paper. If it is above 7, add more lime. If it is below 7, add more Alum.
- When the Ph measures 7, the water is neutral and the clear water can be carefully poured off and filtered.
- I used 2 coffee filters are suggested and as you can see from the photographs, the water was completely clear. The water ran through the filters very quickly. I may try re-using the outer coffee filter on my next round with a second clean filter as it came out unclogged with particles. I will update this post with a result when I do.
- There was a substantial pile of solid paint material left behind. This was the most successful method for cleaning used painting water. From what I have read, it is fine to discard this solid material in your usual way. However, the best way would be to take it to your local council waste centre where they take used household paint for disposal. I plan to collect it in one of my 5 litre buckets with a lid and take it to the council when the volume warrants a trip.
Notes:
- You can use approximations for the Alum and the Lime – roughly 3tsp would work for 5 litre of water. I used an old spoon measure which is now part of my water cleaning kit.
- I try to reduce the use of consumables so I used an electronic pH meter rather than the papers. It was not expensive and is proving useful in the garden.
- The best way to reduce the impact on the environment is to re-use as much as possible so you’re not always buying more:
- Buckets – Bird feed comes in 5l plastic buckets. I re-use these for water in the studio and now for cleaning used painting water.
- Funnel – if you get soft drinks in 2l plastic bottles, you can cut the bottle about 1/3 of the way down. The top can be turned upside down and used as a funnel. The bottom is a good size for receiving the filtered water
Things I bought:
Now that I have a safe and effective method of cleaning used painting water I feel much better about using acrylic paint. If you have a different, and equally effective method of cleaning used acrylic painting water before disposal, please let me know. I would love to add it to this post.

Thank you for this post, the details are very helpful. I live in Arizona (SW part of the U.S.) and the climate is very dry, so I think I can get away with easy evaporation within a couple of days. However, for larger quantities of paint water, the Alum and Lime will be a go-to for me. Thanks again.